
Chrome Security Enhancements & Tips
Updates on various Google Chrome browser security enhancements and how to use them.


Google Chrome has recently overhauled its security tools to be much more proactive. Here are the most important live security features you should activate to protect your browsing data.
Some new security enhancements to Chrome browser & OS have recently been added since version 84.0.4147.135 onward. I’ve also included some tips on turning on additional Chrome browser & Chrome OS security features to further enhance your online security.
Automatic "Safety Check"
Chrome’s Safety Check feature now runs automatically in the background. It continuously monitors your browser health, alerts you to compromised passwords, revokes permissions from sites you haven’t visited recently, and flags deceptive notifications.
How to view your Safety Check status:
Open Chrome and click the three dots (⋮) in the top right.
Click Settings.
Select Privacy and security on the left menu.
Under the Safety Check section, review any recommended actions (like removing a bad extension or updating a compromised password).
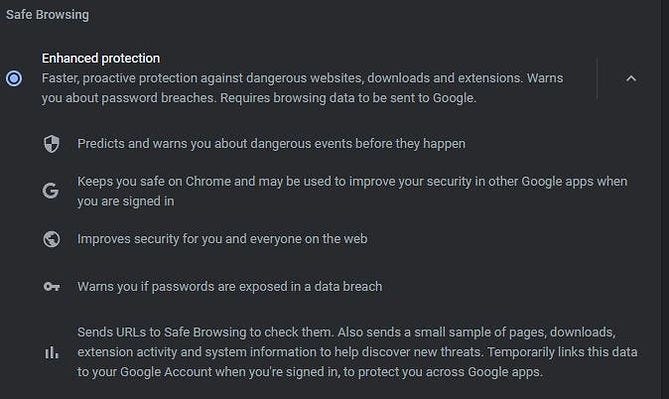
Enhanced Protection (Real-Time Safe Browsing)
Standard protection relies on a static list of known bad websites. Enhanced Protection goes a step further by using real-time AI to actively scan for new, unknown phishing sites and malware before they can load on your screen.
How to turn it on:
Go to Settings > Privacy and security > Security.
Under the Safe Browsing section, select Enhanced protection.
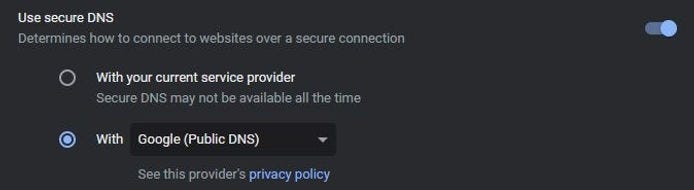
Use Secure DNS
This feature encrypts your web traffic requests so your internet service provider (or anyone snooping on your local network) cannot easily track which websites you are visiting.
How to turn it on:
Go to Settings > Privacy and security > Security.
Scroll down and toggle on Use secure DNS.
Select the With option and choose a secure provider from the drop-down menu (such as Google Public DNS or Cloudflare or one of other 4 providers including one that has CleanBrowsing (porn filter)).
How to use Secure DNS (Under subheading Use secure connection...). You may need to re-tick and tick as it seems to drop off initially. Important: If your device is managed by your Organisation or parental controls are turned on, you can’t use Chrome’s secure DNS feature.
One-Time Permissions
Instead of permanently giving a website access to your microphone, camera, or location, you can now grant permission for a single session. Once you close the tab or leave the site, Chrome automatically revokes the access.
How to use it:
When a website asks for access (e.g., to your microphone), a prompt will appear near the address bar.
Select Allow this time.
HTTPS-First Mode
This setting forces Chrome to upgrade all your website connections to a secure, encrypted format (HTTPS). If a site doesn’t support encryption, Chrome will display a full-page warning before letting you proceed.
How to turn it on:
Go to Settings > Privacy and security > Security.
Scroll down to Advanced and toggle on Always use secure connections.
Disable Ad Privacy Tracking (Topics API)
Chrome is phasing out old third-party cookies, but it has replaced them with a system that profiles your browsing history directly within the browser itself to serve you targeted ads. For maximum privacy, you should turn this off.
How to disable it:
Go to Settings > Privacy and security > Ad privacy.
Go into Ad topics, Site-suggested ads, and Ad measurement, and toggle all of them off.
Audit Your Site Permissions
Over time, we give dozens of websites access to our camera, microphone, and location. Chrome automatically removes permissions from sites you haven’t visited recently to protect your data, but doing a manual cleanup is highly recommended.
How to review them:
Go to Settings > Privacy and security > Site settings.
Review the permissions for Camera, Microphone, and Location, and remove access for any sites you don’t recognize or need.
Use Separate Browser Profiles (Crucial for Sole Traders)
Mixing personal browsing, business admin, and financial tasks in one browser window is a major risk. If you accidentally click a bad link while doing personal browsing, it could compromise your logged-in business accounts.
How to set it up:
Click your Profile picture in the top-right corner of Chrome.
Click Add profile.
Create distinct profiles (e.g., “Cyberkite Admin”, “Personal”, “Finance”) and give them different color themes so you immediately know which environment you are in.
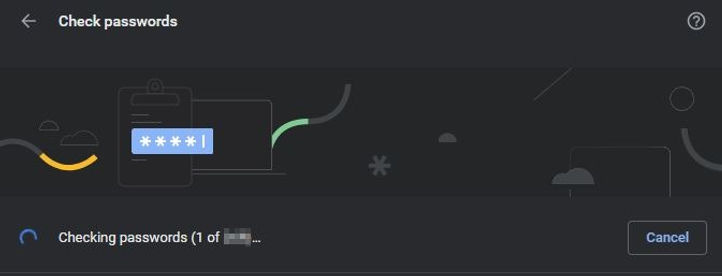
Password Checkup (Audit for Compromised Credentials)
If you use Chrome’s built-in password manager, you should regularly scan your saved logins to see if any have been exposed in third-party data breaches, or if you are using weak and reused passwords.
How to run the checkup:
Open Chrome and click the three dots (⋮) in the top right corner.
Hover over Passwords and autofill and select Google Password Manager.
On the left-hand menu, click Checkup.
Chrome will categorize your passwords into: Compromised, Reused, and Weak.
Click on any flagged passwords and follow the prompts to go to the associated website and update them immediately.
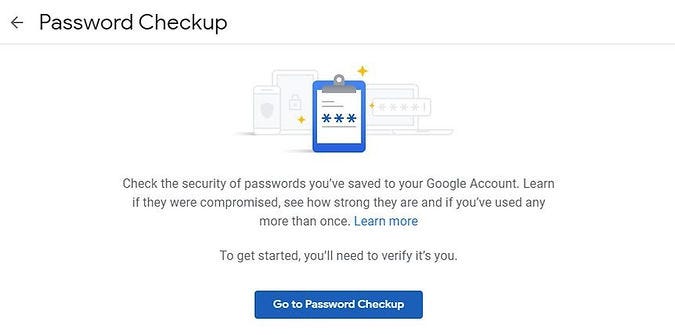
It will do the check for websites that have had their password compromised. (If you sync your passwords under Chrome browser/Google account). This replaces the Password Checkup extension that Google has deprecated from 31 August 2020. About new Password Checkup (Under subheading Check your saved passwords)
Login to web based Google Account Password Manager with your Google account & select Go to Password Checkup and change passwords for any sites that use same password to a unique for each and save it in Chrome synched with Google account.
How to use Password Checkup on online Google Password Manager.
Optimize Google Password Manager Settings
If you use Chrome’s built-in password manager, you should adjust two critical settings to protect your saved logins from both physical snooping and hidden phishing scripts.
Require Authentication to Autofill (Windows Hello / Mac Screen Lock) By default, anyone sitting at your unlocked computer might be able to use your saved passwords. You can force Chrome to ask for your fingerprint, face scan, or computer PIN before it fills in a password.
How to turn it on:
Go to Settings > Autofill and passwords > Google Password Manager.
Click on Settings in the left-hand menu.
Toggle ON the option for Use Windows Hello when filling passwords (on Mac, this will say Use your screen lock when filling passwords).
Disable “Sign in automatically” (Anti-Phishing Shield) If this is turned on, malicious scripts on compromised websites can sometimes trick your browser into automatically submitting your saved credentials into invisible forms without you clicking anything. Turning this off ensures you are always in control of when your password is submitted.
How to turn it off:
In the same Google Password Manager > Settings menu.
Toggle OFF the switch for Sign in automatically.
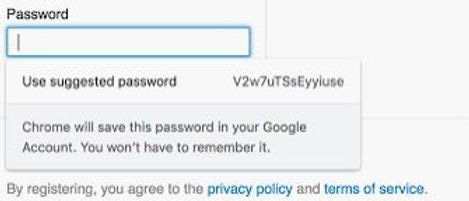
Suggest Strong Password (The Built-In Generator)
When you are creating a new account or updating an old password, you shouldn’t reuse an old one or try to invent a new one yourself. Chrome has a built-in generator that creates a long, complex, and unique password for you, and saves it automatically.
How to use it:
Make sure you are signed into your Google Account in Chrome and that password syncing/saving is turned on.
Go to a website and begin signing up for an account.
Click on the text box where you need to enter a new password.
A prompt will appear saying Suggest strong password (if it doesn’t appear, right-click the text box and select Generate password).
Click Use suggested password. Chrome will fill it in and automatically save it to your Google Password Manager.
When setting up a new account on a site right click on the password field & select “Suggest strong password“ & save them to Google account via Chrome sync. How to use Suggest strong password.
Note: Instructions on Turning sync on and off in Chrome (Important: Only turn on Chrome sync with devices you own. If you’re using a public computer, use guest mode instead.)
Turn on 2-Step Verification (2SV) for Your Google Account
Turning on 2-Step Verification (also known as two-factor authentication) adds a critical extra layer of security to your account. Because it requires both something you know (your password) and something you have (your device), it makes it incredibly difficult for hackers to gain access, even if your password is stolen.
How to turn it on 2SV
Open your Google Account settings.
On the left navigation panel, click Security.
Scroll down to the “How you sign in to Google” section and select 2-Step Verification.
Click Get started and follow the on-screen steps.
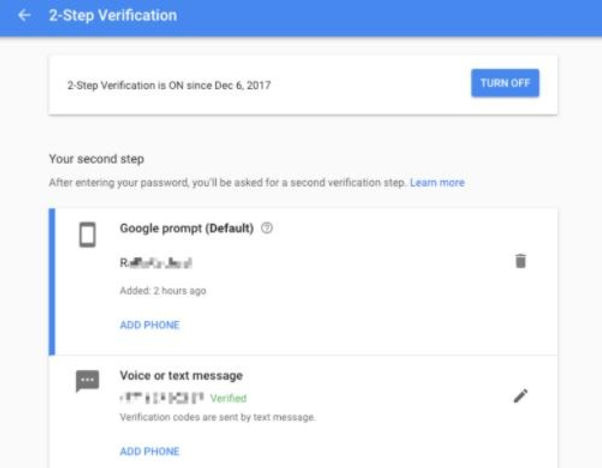
Choose Your Second 2SV Step
Google offers several ways to verify it’s you. It is highly recommended to set up multiple verification methods in case you ever lose your primary device:
Passkeys (Simplest & Safest): This lets you sign in using your device’s built-in fingerprint reader, face scan, or screen lock PIN. Passkeys exist only on your devices and cannot be accidentally given to a bad actor, making them highly secure.
Google Prompts: If you don’t use a passkey, Google strongly recommends using Prompts. Google sends a push notification to your smartphone where you simply tap Yes to allow the sign-in or No to block it. Prompts help protect against SIM swap and phone number-based hacks.
Authenticator App: Apps like Google Authenticator generate temporary verification codes on your phone, even when you do not have an internet connection.
Backup Codes (Crucial Fallback): Generate and save a set of backup codes. These single-use codes are the only way to ensure you can access your account if you ever lose your phone, factory reset it, or are completely offline. Store them in a safe place or a password manager.
How to do it. And read up more on 2 Factor Authentication on Google account.
Keep Chrome Updated
The absolute most critical security feature is keeping the browser up to date, as these updates patch active vulnerabilities that hackers exploit.
How to check and update manually:
Click the three dots (⋮) > Help > About Google Chrome.
Chrome will automatically check for updates and download them. Click Relaunch to apply the updates.
Well wishes
I hope the enhancements that you have turned on will help you browser safer online because the digital threats are out there. So the best defence is a good offence. And Just like Victorian WorkCover ad’s used to say but I’ve modified for Cybersecurity:
Look it
Think it
Don’t click it (if in doubt)
Happy computing
Michael Plis